Thursday, December 13, 2012

Cookie time! Bah-bah-bah-bahm! Bah-BUHM. Bah-BUM!


Christmas is 12 days away!  I'm going to be giving baked goods to friends this year.  If any of you are reading, sorry for the spoiler!  

Today, I'm working with a couple of recipes.  I decided to bake today because it's the first time in close to a week that I got a good night's sleep thanks to Nyquil.  Insomnia runs in my family and it's just my turn this week.  

But there is a little energy today and I'm expending it on baking.

Here we go!

First, we'll do classic chocolate chippers.  I would like to brag that when we had the chocolate chip cookie throwdown in culinary school I won by a landslide.  I'm not exaggerating.  I got all but six votes out of around thirty.  I did a little victory dance and yelled "In your face!" or some such thing.  Karla?  Do you remember what I was shouting?  

Anyway.......

Preheat the oven to 360.  That's right, 360.  Yes, I am a picky bitch.  Deal with it. 
Moving on!
Put 1 cup of butter, 1/2 cup of sugar and 1 1/2 cups of packed brown sugar into a mixer.  You'll let this mix around until it's nice and fluffy.  Go beyond it just being combined, really get some air into it. 


Once the butter and sugars are fluffed. (huh huh huh, I said fluffed.)  Add 2 eggs and a teaspoon of vanilla.  Let this mix again for a couple minutes.


The dry ingredients are:  2 3/4 cups flour, 1/2 teaspoon salt, 2 teaspoons baking soda and 1 teaspoon cream of tartar.


Gradually add this to your butter/sugar/egg/vanilla stuff.  Mix it until it comes together.  Scrape down the bowl and make sure it's all together and cooperating and all that stuff.


For chocolate chips, I just add as many chocolate chips as I want in the finished product.  I like a cookie that's mostly chocolate chips with just enough dough to hold them together.  If you like fewer chippers, add less.  Let's say 'to taste'.  If you bake this dough without the chocolate chips, this becomes what's known as a "Brown Sugar Cookie".


Get out a tablespoon and plop these down on a cookie sheet.  I like to put parchment paper on the baking sheet so I don't have to wash the pan.


Bake these suckers for about 12 minutes.  When you take them out of the oven, let them sit for a couple minutes and then get them off the sheet pan or they'll keep cooking.  These have crispy edges and a soft center.  Yum yum yum!  Hide some away for later if you have children who will gobble these down.


While these were baking I got another batch of cookie dough together.  Again, chocolate chip cookies but with peanut butter.


I am going to point out that this recipe comes from a book called the Cooky Book that my mother-in-law gave me.  Copyright?  1963!  Thanks Jan!

Okay, keep the oven at 360.


Into the bowl of your mixer, don't worry about cleaning it first, put 1 cup of butter, 1 cup of peanut butter,  1 cup of sugar and 1 cup of packed brown sugar.


This is my favorite part of the cookie dough to nibble on so I always have a couple spoonfuls of the stuff.  Since I love it so much, here's a picture of it:


Put two eggs into this mixture and mix it up until the eggs are well incorporated.


The dry ingredients are:  2 1/2 cups of flour, 2 teaspoons of baking soda 1/2 teaspoon of salt and 1 teaspoon of cream of tartar


Again, you'll add this in gradually.  You can add chocolate chips to this or just bake 'em up.  I always make some without the chocolate in case the kids' friend Gwen comes over. She doesn't like chocolate and, without fail, she'll show up on the day I make cookies that all contain chocolate. So, I try to be prepared for that situation. 


Pop these into the oven for about 10-12 minutes.

Jingle Bells!

Friday, September 7, 2012

Tomato sauce! Meatballs! Eat them up yum!

Okay, I know it's been a loooong time.

This week I promised the family that I'd make spaghetti and meatballs.  I once ran out of time for dinner preparation and I had to go with what I had in the pantry.  I found a can of pasta sauce and put that on some pasta with parmesan.  The kids ate it.  Scott took a bite and told me he thought the sauce had gone bad.  I explained it was just opened.  He put his bowl aside and said I'd spoiled him by making my own.

So, now I make my own.  It's one of the five mother sauces so I'd better know how to make the damn stuff.

Here we go:


Ingredients:

1 cup chopped onion
1/2 cup chopped carrots
1/2 cup chopped celery
1 big can of crushed tomatoes
1 big can of tomato sauce
1 tablespoon of tomato paste
crushed garlic to taste
salt
pepper
bay leaf
dried thyme
1 garlic clove, whole and peeled

Equipment:
a pot
a tea ball (don't worry I'll explain)


First, get your veg into the pot over medium high heat and get 'em sweaty.  You're not looking for brown, just letting some moisture go.  Add in your tablespoon of tomato paste.  You're going to let that cook until it turns a red-orange-golden color and smells more sweet than acidic.  This is called making a rust.  Once you've reached this stage, add in your tomato products.  You can also use whole tomatoes you've crushed up yourself, toss in some red wine, use crushed tomatoes and chicken broth or veggie broth (for a vegan option).


Now we're going to make a sachet  (pronounced sashay).  Traditionally, this is tied up in cheesecloth, but since I didn't have any on hand, I used a tea ball.  I like this method.  Put the bay leaf, a few springs of dried thyme, the garlic clove and if you have some peppercorns, toss those in too.  Close it up and drop it into the sauce. 


Bring everything up to a boil, then turn the heat down to low and let it simmer until you like the consistency.  I made this sauce thin, as is the children's preference.  Once it's cooked down, you can puree it in a food processor and get the veggies ground up, this will make the sauce thicker.  Since my kids won't eat anything that even vaguely resembles a vegetable in their pasta sauce, I simply strain the veg out and serve it up.


On to meatballs!


Ingredients:

2.5 pounds of ground beef
1 cup of bread crumbs
1 cup of milk
onion powder
crushed garlic to taste
1 egg
salt/pepper (of course)

Equipment:

bowl
roasting/broiling pan


First, we're going to make a panade.  (pan-ODD)

Combine the bread crumbs with the dry ingredients.  I use onion powder because I really like the onion flavor but my kids will complain if they find an onion.

Now pour in the milk until you have a thick paste, it should look kinda gross. 


Dump all the ingredients into a bowl and mush it around with your hands.  Parmesan can also go in, which is yummy, but I didn't have enough cheese for both meatball  additive and pasta topping.

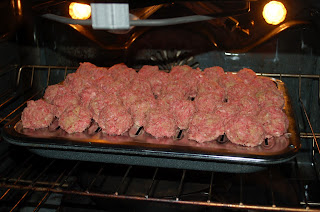
Once it's well combined, start to make balls.  


I like to use a roasting/broiler pan because the slits let the grease drip away but are narrow enough to support the meat.  Stick 'em in the oven at 350 for ten minutes to start.  If you make little, tiny meatballs start with five. Cut into one to make sure they are cooked all the way through, you don't want them undercooked and holding onto some icky bacteria that will make you sick.  


Take 'em out.  Let 'em cool.  Om nom nom. 


Remember:  Life is difficult.  Cooking helps.

Sunday, March 4, 2012

Oxtails!

I have another practical exam coming up this week.  This means that I go into the kitchen and demonstrate that I can do what we've learned.  It's like a test in chemistry class where you rattle around the test tubes.  We're finishing up how to cook meats.  The meats we'll be working with are beef oxtail, beef shoulder top blade, pork loin and pork tenderloin.

Since I've never done anything with oxtail I decided that I should probably practice by cooking them at home.

I chose to make osso bucco but with oxtail instead of veal shank.  You cook it the same way, by braising it.  Braising is a long, low cooking process for meats that are tough but will become tender and flavorful with the low and slow cooking.

Here we go!

You'll need:


oxtails, red wine, celery, onion, shallot, garlic, carrot, a can of crushed tomatoes, beef broth, tomato paste, flour and salt and pepper.   Preheat the oven to around 220.  Yes, two hundred and twenty degrees. This is going to be low and slow.


Prepare the vegetables like so:

Chop the onion, carrot and celery.  You'll want twice as much onion as carrot or celery.  This is known as mirepoix (mere-eh-pwah) and is used in many of the classic sauces and in just about all stocks.


Mince up the garlic and shallot.


Put all those chopped veggies in a bowl and set it aside to use later.

First, I cooked up some bacon because bacon is the cat's meow!  Also, because I wanted to use the bacon grease to brown the meat and since I had no bacon grease on hand I needed to cook bacon to extract the grease.  I cooked it in my big, cast-iron dutch oven.  This style of bacon cookery is known in my family as "Grandma Gay style".  You toss the unseparated rashers of bacon in the pan and stir it around as it cooks.  I'm sure you've figured out by now that it's the way my Grandma Gay cooked bacon.


I fed the bacon to my family and my daughter's friend who happened to be at our house at the right time. Then, I seasoned some flour with salt and pepper and used it to dredge the oxtails.


I dropped them into the hot bacon fat and let them hang out.  My chef instructor will tell us 'Stop moving it!' while we're supposed to be browning meat.  "Stop moving it!  How's it going to get brown if you keep moving it?! You're trying to get a fond! Leave it alone!"  (a fond is the lovely, crusty, yumminess on the bottom of the pan that happens when you brown meat or chicken or whatever)


I left them alone until, turning them every now and then until all the sides were brown.  While that's happening you'll want to get all your stuff together and in easy reach so when you are doing the upcoming steps you don't have to run around getting your ingredients and all that.  Putting all your ingredients in the little bowls, all ready to go is called 'mise en place' (meez-ahn-plahz)  or mise in my culinary class.  "Mise! Mise! Mise!" my instructor tells us.  "Get mise'd you guys!"  I hear that in my dreams.  "Is your mise done?"  Mise us, please us!


I took the meat out of the pot and set it aside.  Into the hot fat I dumped the veggies that we cut up and put in a bowl before.  Move these around until the onion is tender, be careful not to burn the garlic.


After the onion is tender and the veg is smelling good, add a couple tablespoons of tomato paste.  Smear that around in the bottom of the pan and let it cook until it starts to turn a golden orange and smells sweet. That's the sugar caramelizing and is known as a rust.


Once your rust is achieved it's time to deglaze the pan, meaning to add liquid and scrape all that yummy, crusty, brown fond up off the bottom of the pan.  We're going to use red wine, about a cup.  I think.  I mean, it looked like a cup after I poured it in.  I can't tell you how much of the bottle I used because I drank some right after that.


Ideally, this should be done off the heat but my cast-iron cauldron is heavy and it's not practical to hold it off the flame to dump the wine in.  When the wine hits the hot pan it should shout and make a bunch of noise.  While it's complaining use a wooden spoon to scrape up the fond and redistribute it into the rest of the stuff in the pan.

Now it's time to put the meat back in the pan.


Add in the can of crushed tomatoes and then enough beef broth to bring the level of liquid about 2/3s of the way up the sides of the meat.  Don't cover, that's stewing.  We're braising.


Bring this up to a boil on the stovetop then put a tilted cover on the pot and stick the whole kit-n-kaboodle in the oven.


Don't even think about looking at it for at least an hour and a half.  This gives you the opportunity to watch "Paranormal Activity 3", which is now available at Red Box.  I suggest watching this flicker during the day, which is why I mention it here.

Once your movie of choice is over, open up the pot and turn the meat over so the other side is submerged.  Let that cook for an hour and a half at least.

This process take a long time.  A LONG time.  The tail meat is tough and needs the long cooking time to break down the connective tissue and make the meat tender.  As my instructor says 'We're going to cook it to death."   The meat is done when a fork slides into the meat easily and then slides out easily.  When the fork is turned while it's in the meat, the meat should break apart easily.  When it's pretty much done, take some of the cooking liquid out of the pot and strain it into a saucepan.  Put the veg and stuff back into the braising pot.


Put the cooking liquid on a burner and bring it to a happy simmer to reduce it down to a thicker sauce.  This will take awhile as well, but be patient and reduce it by at least half.

Now we're going to do something called "mounting with butter".  It means to drop some butter into a sauce and swirl it around in the sauce until it melts in.  This gives richness, thickness and deliciousness to the sauce.  Once that's done you could have the sauce for dinner with bread to dip in it.


Take the meat out of the oven and place one of the rounds on top of some pasta or rice and put the sauce on top.  Voila!  Oxtail osso bucco!

Do I have a photo of a finished dish?  No.  I don't have one because we were all so hungry from smelling the stuff cooking all day we fell on it like we hadn't eaten in days instead of mere minutes.


Get someone else to do dishes.

See ya!

Thursday, November 24, 2011

Makin' a mince pie!

Okay, this mince pie doesn't have any meat in it, just pecans, apples, raisins, sugar and spices.  My dad spent a decade not eating mince pie because he thought there was meat in it.  Ten years of missing out on the goodness of this yummy pie.  This is The Husband's favorite and I make it for him every year during the holidays.

Here we go:


First the crust.  You'll need:
3 cups flour
3 tablespoons shortening 
(you can use lard if you like, but not bacon grease)
8 tablespoons butter
about 1/4 cup cold water
a big bowl and a pastry cutter, two forks or just your hands


Put the butter and shortening in with the flour.


Cut the fat into the flour with the cutter or whatever it is you're using.  I like to start with a pastry cutter and then finish with my fingers. In some older cookbooks you'll see the process referred to as "rubbing", meaning actually rubbing the fat and flour between your hands.  That doesn't work for me, but I'm probably doing it wrong. 


When it starts to look like Bisquik with lumps, you're just about there.  The fat should be worked through but the mixture shouldn't be fine.  This is one of those weird things where you just have to know how to do it through experimentation and practice, but once you get the hang of it you can do it in your sleep. 


Now, pour in about half the water.  Make your hand into a cup and start to scoop the water into the flour,  try to work the dough into a ball, adding more water as needed until you have succeeded in doing just that.  


The dough should just stick together and when you stick your thumb in it it should leave a hole. 


Wrap it up in plastic and let it hang out in the fridge for a couple of hours or until you need it.  Yes, that's Tab in my fridge because Tab is the most. 


Moving on to pie filling.
2 cups dark raisins
2 cups pecans
4 golden delicious apples
1 1/2 cups sugar 
(I used sugar in the raw because I can never remember if we have sugar or not. Generally, I guess wrong that we don't have sugar, then I buy more sugar and we end up with multiple bags of sugar.  Then I assume for a while that we do have sugar and don't buy any.  Turns out we didn't have any white sugar and there's got to be a LOT of money in it for me to even go into the parking lot of a grocery store the day before Thanksgiving so I used what I had on hand.)
4 tablespoons butter
3/4 cup apple juice
juice of one lemon and the zest of half of it
1 tablespoon cider vinegar
a generous sprinkle of cinnamon and whatever other spices you like (nutmeg, ground cloves, pumpkin pie spice.  Stuff like that)


Roughly chop up the pecans and raisins.


Peel, core and chop the apples.  Is it me or does the whole apple seems to be contemplating his fate? 


Put all the ingredients in a pot and put it over medium heat until it comes to a simmer.  Lower the heat and let it bubble until the liquid is almost all gone, the pot is almost dry and the nuts and fruits are coated in a thick, syrupy sauce.


It'll look like the photo above, expect the process to take between 40 minutes and an hour.   At this point you'll want to taste it and adjust the seasoning if you like.  Set it aside and let it cool.


Get your pastry crust out and split it into two equal parts.  Plop one down on a floured board and start to roll it out.  


Obviously, you're looking for a circle for your pie pan.  I like to take pieces from the uneven edges and move them to a different spot to change the shape, then keep rolling.  


Now that it's big enough to line the pan, roll it around the pin and then unroll it into the pie pan.   


Be sure to gently pat the dough all the way down into the bottom. Trim the edge or just smoosh it into a rim.


Repeat that process with the other piece of dough and put it on top of the filling that I should have told you to pour in.  I'm assuming you know to put the filling in.  
Cut steam vents in the top.  I get fancy-schmancy and make leaves and berries to decorate.
Pop this into a 400 degree oven for half and hour, then lower the heat to 350 and let it go another half an hour. 


Look!  A pie! Serve warm or keep it in the fridge for up to a week. 


As usual, get someone else to do the dishes.

See ya!